For Teachers
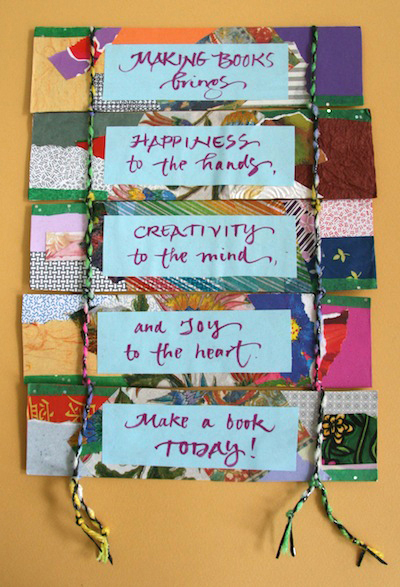
Making books brings creativity and curriculum, often viewed as opposing forces, together. I've made books with thousands and thousands of children during twenty plus years of teaching in schools and I can't think of any children who couldn't wait to write in their books when we finished the session. This enthusiasm continued as they researched and wrote. Teachers reported back that their students put so much more effort into their books than usual assignments.
Over the years I've worked to make bookmaking as easy as possible. I now use repurposed materials as much as possible which saves preparation time. I don't get hung up about precision and perfection. The more joy in the process, the more books you and your students will want to make. The more books they make, the more writing and learning will happen.
Tips for Teaching
Tools
Materials
Tips for Teaching
*Break the process into the smallest and simplest steps possible.
*Practice the process before you do it with the class. It will take some extra time, but think of it as an investment. If the experience is a positive one and the project works, you can use it again many ways and many times. When I develop a new project, I make the book several times, writing down the steps as I go. I try to get the language as precise as possible. Once I decide on the process, I rehearse it a few times out loud.
*Be flexible. You may find that your directions are not as clear as you thought. Be prepared to adjust and change. Watch and listen to the kids. Sometimes they will do a step a better way.
*If you want to talk to the kids first, don't put any materials on the table or you'll have to compete with simple things like scissors and glue sticks for their attention.
*Work in unison. Do not let anyone go ahead. I am a bit of a tyrant when I teach. I strictly enforce the don't-go-ahead rule. There's plenty of time for exercising creativity when the students do the contents of their books. The skills they are learning here are how to listen and follow directions.
*Once your students are comfortable making books, set up a station or make kits in resealable plastic bags with materials and tools so they can continue on their own.
*I prefer to make the structure first and then have the kids add the content. I find that they are more interested in writing and research when they have a book that they have made waiting to be filled. You can certainly combine computer text and imagery with bookmaking, but I encourage the kids to write and illustrate their books by hand. It's a great time to leave the computer screen behind. The finished books will then be true expressions of the children in every way.
Tools
I store my sets of tools in a clear plastic shoe boxes which I place in a large Rubbermaid box when I travel to schools. To be more environmentally friendly, you can collect cardboard shoe boxes and have the children make labels.
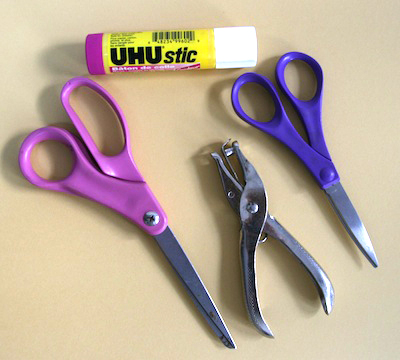
* Scissors: It's important to have decent scissors. The Fiskars brand kids scissors work well. I have the pointed ones, which are still not too pointy and use them for kindergarten and up. I also have a lot of big scissors that I bought when I started and thought I would be mostly teaching teachers and parents. I've had students as young as first grade use them without a problem, and with the additional thrill of using grown-up scissors.
* Hole Punches
* Glue Sticks: For me, glue sticks are the only way to go. They are neater than white glue and because there is no moisture in the glue, the paper will dry flat. I prefer colored glue sticks. They go on a color so you can see where the glue is but dry clear. If you can't get colored glue sticks for everyone, I recommend you do use one for your demonstration as it is easier for the children to see where the glue goes. My favorite is UHU brand.
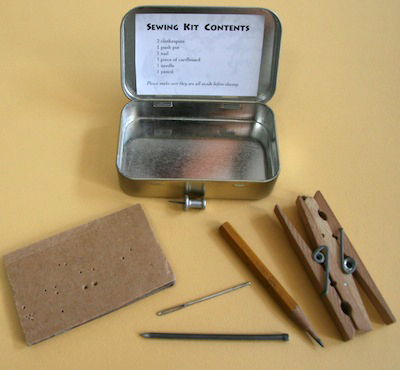
* Sewing Kits: There are lots of small bits and pieces when you sew books together. I was losing lots of needles and nails until I decided to make sewing kits. I used to use resealable sandwich bags labeled with a printed list of the contents. They would often tear. With my new environmental approach, I now use Altoid boxes with labels. All my problems are not solved. I still have to check each one between sessions as the items often get jumbled.
* 1 size 16 tapestry needle (These have a very large eye. They're bigger than one would usually use for bookbinding but they're easier to thread. I purchase them at JoAnn Fabrics in packs of 5.)
* 1 small pencil (for marking the holes)
* 1 nail (to make holes for Japanese bindings)
* 1 push pin (to make holes for pamphlet binding)
* 1 small piece of cardboard about 2"x 3" (to protect the table when making holes for a pamphlet binding)
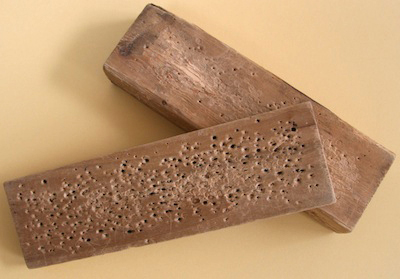
* Blocks of Wood: about 3" x 8" x 1" each, used in sets of two. They are used with the nail to make holes for Japanese binding: one goes underneath the book to protect the table, the other is used as a hammer.
* Scrap Paper: for gluing. I use old catalog pages (selected with care. I avoid clothing catalogs as you ever know when there will be underwear.) or used 8 1/2" x 11" paper.
Materials
I have been using recycled, or more accurately repurposed, materials in my workshops for the past year. The students bring in brown paper grocery bags and cereal boxes and teachers collect used paper that has writing on only one side. I made the change to be more respectful of the environment and reduce consumption but the benefits go way beyond that.
On the selfish side, it has been a relief not to keep track of, store, and carry paper for the workshops. When teachers make books with their classes, they too are relieved of the burden of preparing the paper.
The best part is what it does for the kids. We live in an instant culture filled with manufactured objects. It is not their fault that they expect their paper perfect and think nothing of asking for a new piece when theirs has a wrinkle. Bringing in grocery bags and cereal boxes, or using paper that they have already done an assignment or a worksheet on, makes them aware of the paper they consume.
And there are other positive effects as well. When they start by cutting a paper bag, the paper is already uneven so it takes all the burden of precision away. I find it lightens the spirit of the whole process. There is a different energy in the room as they transform boxes and bags into books. In addition to consuming less paper, they learn to look creatively at the things they discard.
Making books with repurposed materials has a different aesthetic. Because we don't start with plain paper, there are often traces of its former life showing. I feel this brings life and vitality to the finished book. I bring examples from my collection of objects made from different materials which includes a bag made from juice pouches from Afghanistan, earrings made from soda cans from Africa, a toy car from Africa made from soda cans, and trivet made from rolled newspapers.
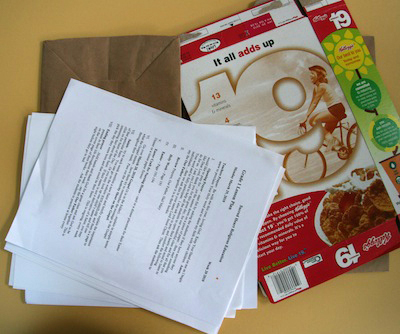
*Paper: Ask the students to bring in grocery bags and cereal boxes. This gives them an investment in the project right from the start. I find it works better if children share the grocery bags. For an example an accordion book uses 1/2 of a front or back panel of the bag. I have 4 children share one bag and take turns cutting. If each child starts with her own bag, there's lots of waste which kind of defeats the purpose.
The cereal boxes are used for covers and for any project that requires stiff paper or cover stock. They can be flattened for storage. I have found that some children want to use their particular cereal boxes. If you want to honor that, it is better to have them keep flattened boxes in their desks rather than collect them all.
I also use copy paper with writing on one side only from the recycle bin. In the Hot Dog Booklet, all the writing is on one side of the paper so this works well for them. For accordions, I fold the paper in half the long way with the writing on the inside and use the folded paper to make the pages of the book.
* Yarn: best for books that use knots to hold them together. Ribbon tends to be too slippery to hold. There are a lot of interesting variegated yarns available. I save scraps of yarn and string.
* Ribbon: I use it for ties on accordion books. I buy it at craft stores as well as save ribbon from packages.
*Thread for sewing: Crochet cotton, Dental floss, Carpet thread.
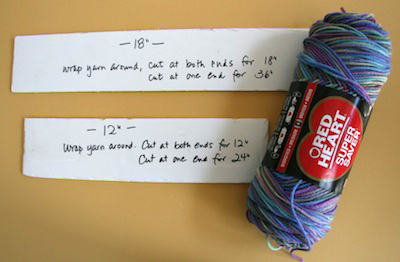
* Cutting Yarn, Ribbon, and Thread: To save time cutting, I have pieces of heavy corrugated cardboard cut to specific lengths. The two sizes I use are 12" and 18". I wrap the yarn or ribbon around the cardboard. For yarn the length of the cardboard, I cut it at both ends; for yarn twice the length of the cardboard, I cut it at one end only.
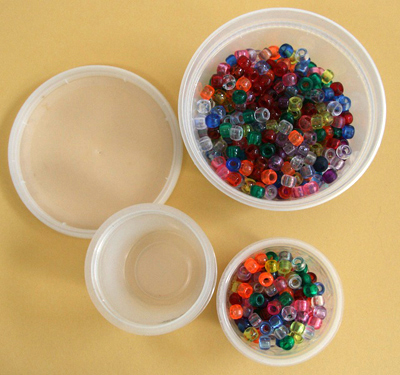
* Pony Beads: for palm leaf books and wish scrolls and to have fun tying them onto any book. They have large holes which make them easy to use with yarn. I buy them at Michael's, or A.C. Moore, or anywhere I come across them. They are more economical in larger packs. I store them in cream cheese or other plastic containers and pour them into applesauce or other small containers for use in the workshop.
* Other Beads, Buttons, and Shells: I always look at necklaces and bracelets at yard sales and rummage sales and buy ones with interesting beads. I've also purchased plant holders made from shells. I take them apart when I get home. They can be stored in resealable plastic bags, jars, or plastic containers.
* Plastic bread closures: can be used instead of beads
* Elastics (I save them from vegetables and the newspaper delivery)
* Scroll cases: The wish scrolls from Ethiopia are placed in containers and worn. Originally I used film containers. They are still available but much less common. Other possibilities are prescription containers with the labels removed, the tops of some glue sticks, and any other small tube-like container.
For Illustrations
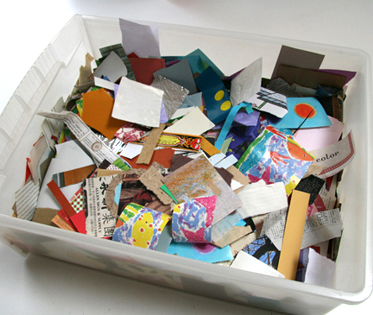
* Collage Papers: I cut up any interesting colored paper that comes my way--wrapping paper from a package, paper bags, security envelopes, origami paper, art papers, etc.--into ssmall pieces and keep them in the box. I find that the smaller size wastes less paper and seems to stimulate creativity in a way that large pieces of paper don't.

* Stencils: Dover Little Activity Books has a series of inexpensive Fun with Stencils books with 6 pre-cut stencils in each. There are ones on Dinosaurs, Flowers, Northwest Indian, Pirates, Egypt, and many more. I've seen them in bookstores, card shops, and toy stores. I order mine directly from Dover Publications, Inc., for the largest selection. I also buy letter stencils and other plastic stencils. I have made stencils by tracing cookie cutters onto poster board, cutting the image with an exacto knife, and protecting them with clear contact paper. I also made a series of sea life stencils by tracing pictures from books and transferring them to poster board.
* Markers: I like markers for writing and for the vibrancy of color in drawing. However, they can bleed through so I test the marker first on an extra piece of paper if I am going to be writing on both sides of the paper. For the writing, it may be helpful to write the text lightly in pencil, proofread it, and then go over it in marker. Whiteout should be used cautiously; it can make a mess. Test it first with the marker on scrap paper. Do remember that even the beautiful manuscripts of the Middle Ages have mistakes. While I don't encourage sloppiness, we need to remember that we are not trying to duplicate machine made books. The touch of the hand brings liveliness and authenticity to our books.
* Colored pencils: Colored pencils are a good choice. While they won't bleed through, some care should be taken to not press too hard when writing on both sides of the paper. Drawings can be made in colored pencil or with a dark marker and colored in.
* Rubber Stamps: In the past few years, I've left my stamps at home as they tend to be messy. I find the collage papers and stencils sufficient but they are certainly a fun source of imagery. I particularly like stamps that create pattern and can be used for borders. To keep the stamps neat--or at least somewhat so, I cover the top of my stamps with clear contact paper before I let anyone use them. I sort my stamps by theme--Flowers and Leaves, Animals, In the Sky, Dinosaurs, Patterns--and keep them on plastic plates. On each plate, I put a label with the Theme and cover it with clear contact paper. I store and transport the plates in resealable plastic bags. I ask students to wipe the stamps on a piece of scrap paper after each use, but I don't do any additional cleaning.
*Stamp Pads: I use micropore stamp pads from office supply places. The pigment stamp pads that are sold at stamp stores have better colors, but they are kind of gooey and can really make a mess. They require more vigilant cleaning.
For video tutorials, visit my youtube channel.
To purchase instructional books and ebooks, visit my etsy shop.
Back to Top
© 1999-2021 Susan Kapuscinski Gaylord
skgaylord (at) makingbooks.com
www.makingbooks.com
|


